


We put the boat away in October and immediately started planning and dreaming of warmer days to come. We considered many projects from what water maker to install to necessary safety equipment to what color cushions we should make. One thing that never crossed our minds was how to repair rudder damage.
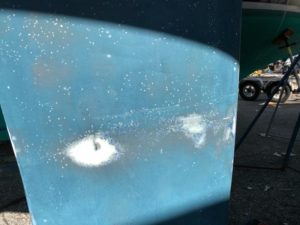 Come April, it was time to start prepping the boat and during a weekend sanding the bottom, I noticed a small crack in the rudder’s starboard side. It looked benign, but I also knew I couldn’t ignore it. I sanded the area and my unfortunate suspicions were confirmed. The
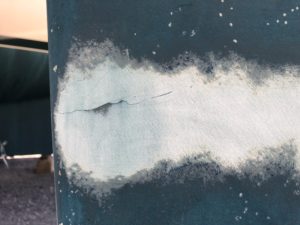 rudder was definitely damaged. It was impact damage, easy enough to address if the damage were limited to this area. Unfortunately, it’s never that simple. I found damage on the port side, no doubt as result of the impact to the starboard side. There were small cracks on the leading and trailing edge of the rudder. This concerned me much more than the hole on the other side. At this point, I’m pretty sure I put the sander down and cried.
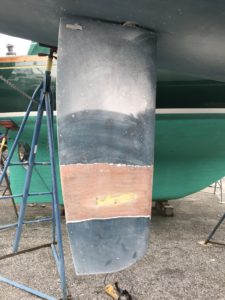 After the shock wore off, the first thing I did was sand the paint away so make sure we saw the extent of it. We also contacted Jeanneau to learn how the rudder was constructed, and we talked to as many experts that we could to make sure we repaired the rudder so it was as good or stronger than it was pre-damage. So what did we learn and how did we fix it? First, I learned it’s
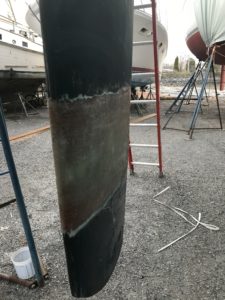 okay to grind. It’s important to remove all the bad glass, and it will definitely look worse before it looks better. Second, taper is really important. As you grind out glass, you should go out at a ratio of about 12:1. So if you grind down 1/4 inch, you need to grind out 12x that in a tapered grind. So a small hole 1/4 inch deep would have a circular repair with a 3 inch radius (1/4 inch x 12 = 3 inches). Basically, you are going to have a large repair area. For this repair, we ended up with an area 14 inches wide all the way around the rudder. Third, it’s really not rocket science. Talk to people, value everyone’s opinion and then ensure you are comfortable before you start the repair.
So how did we repair the damage? Once the extent was known, we talked to as many people we could, and planned the repair. We first used an epoxy fairing compound to ensure a smooth base to begin laying glass. Then we used chopped strand mat, starting with a smaller piece to cover the are of actual damage, and then added successively larger pieces to build up the taper we sanded in the repair area. when we got to full width, we wrapped the area with a layer of biaxial mat to give the repair some strength, and finished it with one layer of chopped strand mat. This would give us a layer to sand into without touching the biaxial mat.

Once the repair was set, we sanded it, used a fairing compound to make the repair smooth, and then applied a two part epoxy primer/sealer before bottom painting. We learned a lot, and have great confidence the repair is stronger than the original construction.
One lesson learned – if it sounds wrong it probably is. The most respected employee at our local marine hardware store recommended I just use an epoxy fairing compound with zero fiberglass to make the repair. I showed him the photos of the prepped rudder with the core exposed, and he told me to just used a fairing compound to build it up. I didn’t feel comfortable with this, knowing the stresses that can be on the rudder. It just didn’t make sense.
Disaster averted – we are still on track to launch next week. With boats, expect the unexpected, take time to grieve, and then get on fixing it.
Nice work!
Great writing and philosophy on boat repair- thanks so much for sharing. Out of curiosity, where do you store your boat that they let you do your own work? Generally, we have found that a boat yard wants to do the repair work.
Thanks again!
Becca Kosakowski
Interesting. Our boat was stored all winter at Southport Marina in South Portland, Maine. This yard will not allow contractors without invoicing through the marina, but does allow us to do our own work. In fact, the maintenance manager helped guide me through the repair and even gave me access to their best FRP guy, which I consulted with on several occasions. They were a great help!